NetStore Backoffice and Administration comes preloaded with the following multimedia types:
- Audio
- Image
- Thumbnail image (used in, e.g., the Product catalogue if you want to see a small image, like Offer or New).
- Movie
- Text document
These can be connected to:
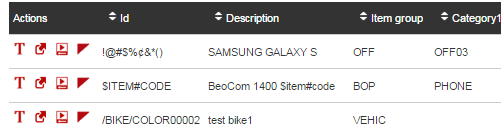
- Items
- Catalogues
- Pages
The following is included in this routine:
NetStore provides a default folder for storage of your multimedia, which is created during the installation process. Depending on your configuration the multimedia resources will be stored in the applicable sub-folders.
Example:
../IBSStaticResources/Bo_Resources/IMAGE. In this case, your resource location uses the multimedia type “IMAGE” when storing all your images together. If you do not want to use these folders, you have to set up the applicable new resource locations (and perhaps change your Property files).
Connecting multimedia
The process is similar for each multimedia type, but the following will describe how to connect an image to an item using your own resource location.
Note: If you plan on using the default folder created for you during the installation, then you would bypass steps 1-3.
- Click Resource location.
- You access the Resource location window. Click New.
- ID
- Description
- Location address
- Enter the location where the multimedia will be stored.
a. If you have several Enterprise/Iptor.com companies with different NetStore instances but same products then item resource location is absolute and should be entered as given below.
http://10.29.21.82:8095/NS8/IBSStaticResources/Bo_Resources/MINI_IMAGE/
b. If you have only one instance then item resource location is relative and should be entered as given below.
/NS8/IBSStaticResources/Bo_Resources/MINI_IMAGE/
- Click Item.
- Click the Multimedia button for the applicable item.
- Click New.
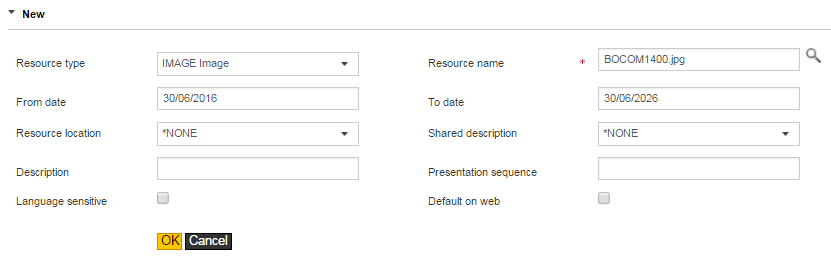
- Resource type
- Select the applicable type of multimedia from the drop-down list.
- From date
- Defaults with today’s date, but can be changed to that applicable.
- To date
- Defaults with today’s date plus 10 years. Enter the applicable end date valid for displaying this multimedia resource.
- Resource name
- Enter the file name of the resource type.
- Resource location
- Select the resource location from the drop-down list where the multimedia can be found.
- Note: If you plan on using the default folder created for you during the installation you would select None.
- Description database id
- If there is a standard description for this resource, select that applicable from the drop-down list. If one does not exist, you always have the possibility of manually entering the applicable text in Description below. You must, however, select Manual in the drop-down list of this field. See Create and connect descriptions for instructions.
- Description
- Manually enter the applicable text if no description database id is found or applicable.
- Presentation sequence
- You can, optionally, enter the order in which the multimedia should appear.
- Language sensitive
- Check this box for any manually entered description, if you want to provide the description in other languages.
- Default on web
- Check this box if you want the multimedia resource to automatically be shown on the site. This is advantageous for images. However, if you have connected several images, only one will be shown as the default. If you do not check this box, the resource will be shown as a link. The user must click the link to access the multimedia object.
Panel image

Enter the following information:
Click OK.
Panel image
Complete the following fields:
Click OK. You must now refresh the data on the server for the multimedia to be updated.
Refresh data
Use the NetStore Edition Web Administration tool to refresh the data.
- On the Services page, under NetStore, click Administration.
- You access the Administration menu page. Click Close/Shutdown NetStore.
- On the Shutdown of NetStore page, click Close.
- Check Clear site cache.
- Click Shutdown.
- Click Open to restart.
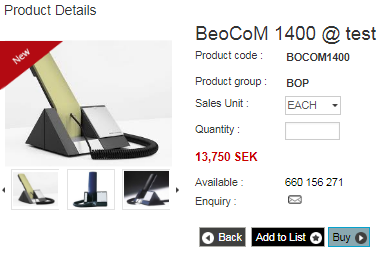
This image will be available to this user on the Product information page for this item. See the example below:
Panel image
Related topics
- About setting up and managing your site
- Configure on application level
- Configure/modify settings
- Configure the settings for sundry users
- Configure and connect data restrictions
- Create and connect texts
- Configure pages
- Define and connect links
- Create and connect descriptions
- Configure shipment tracking
- Translation