You can define as many links as you want, and then connect them to Items. The connection can be done manually or be automatically generated.
The following is described here:
Defining links
- Select Shared link.
- You access the Shared link page. Click New.
- Shared link
- Enter a name for the link.
- Description
- Enter the text that you want to be displayed on the page in NetStore.
- Link address
- Enter the http address of the link.
- Tip: You can exclude the http:// if the address starts with www.
- Language sensitive
- Check this option to make it language sensitive.
Panel image

Complete the following information:
Click OK.
Manually connecting links
You can connect as many links that are defined in the Links database to an Item.
Do as follows:
- Access the object for which you want to connect a link (in this case, click Item).
- Click the
 icon next to the user that you want to edit.
 - Click Links.
- You access the Links page. Click New.
- Shared link
- Select the applicable link from the drop-down list.
- From date
- Defaults with today’s date, but can be changed to that applicable.
- To date
- Defaults with today’s date plus 10 years. Enter the applicable end date valid for displaying this link.
- Presentation sequence
- Enter the order in which the link should appear on the page.
Panel image

Complete the following:
Click OK to update. The User will see this link when he/she has signed on.
Automatically connecting links to items
You have the possibility to automatically assign any links to one or several items – which will be exposed on the Product information page. The link could contain any complementary information that you deem useful, e.g., a picture of the item, a text document outlining more details about the item, a sound file, etc.
Prerequisites
In order for the generation to work, the following must be true:
- The applicable data restriction set has been defined for the Item Data restriction.
- The actual resource type, for which the link will be generated, must exist in the applicable resource location. For example, if you are going to generate an image link to item ABC, then the image itself must exist in the applicable resource location, with the same name as the item (e.g. ABC.gif)
The following describes how to create a data restriction set for specific item codes to which you want to assign links.
- Click Others.
- Click Data restrictions.
- Click the
 icon next to the Item.
 - On the Data restriction type window, click the Define sets button.
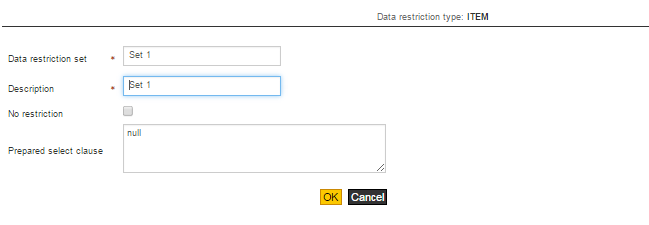
- You access the Data restriction sets window. Click New.
- Data restriction set
- Enter the identification of the new set.
- Description
- Enter a description for the data restriction set.
- No restriction
- Check this box, if there are no restrictions for this set.
- Prepared select clause
- This section will be updated with the actual query once the restriction is used.
- On the Data restrictions window, click New.
- Field name
- Select that applicable from the drop-down list. Since you are going to automatically assign links to the item code here, select Code.
- Operand
- Select the applicable operand from the drop-down list. The following operands have special requirements:
- In and Not in require at least two values
- Between and Not between must have two values
- Like and Not like are wild cards
- Restriction values
- Enter the applicable values to which this restriction should apply, meaning in this case, the item codes to which you want to assign links. The entries in this field are case sensitive.
- Select Item links update.
- You access the Item links update page:
- Data restriction set
- Select the applicable data restriction set from the drop-down list. Here, select the set you created for the Item code.
- Resource type
- Select the applicable resource type from the drop-down list.
- File extension
- Enter the applicable file extension for the resource type.
- Valid from date
- Optional entry. Enter the date from which the link will be valid.
- Valid to date
- Optional entry. Enter the date to which the link will be valid.
- Default link
- Check this box if this should be the default link.
- Submit to batch
- Check this box if you want a batch run of the generation.
Panel image
Complete the following information:
Click OK.
Panel image

Complete the following information:
Click OK and then Exit.
Panel image

On this window you can toggle Generate and Deletion of links.
Complete the following:
Click the Generate button. You will receive a confirmation message in the bottom of the window. If generated successfully, the image will be available on the Product information page for each of the items specified in the data restriction set, assuming the corresponding resources exist. These are here; BEOCOM1400.gif, BEOCOM1600.gif, BEOCOM2000.gif.
Related topics
- About setting up and managing your site
- Configure on application level
- Configure/modify settings
- Configure the settings for sundry users
- Configure and connect data restrictions
- Create and connect texts
- Configure pages
- Configure and connect multimedia
- Create and connect descriptions
- Configure shipment tracking
- Translation