You can generate an HTML page for any information in a table and also send it by email to the appropriate recipient.
Note: Before you can send by email you must have configured your email settings. See Configure your e-mail settings in Analyser for instructions.
Analyser delivers a default template that dictates the appearance of the html pages you generate. You can use this template, modify it or attach another. You can also decide how often the column heading should appear in the generated output. To change this information see Configure your html property settings in Analyser for instructions.
To generate an HTML page and send it by email do as follows:
- Open the applicable menu item, retrieve the data in the table area and do one of the following:
- click the Create HTML… icon on the icon bar at the bottom of the window
- right-click the mouse anywhere in the column heading area – if you want to generate a page for the entire table, or select the appropriate column first, right-click the mouse button and then choose List/Create HTML…
- In the Generate HTML window, complete the Top text and Bottom text areas as desired. Click OK.
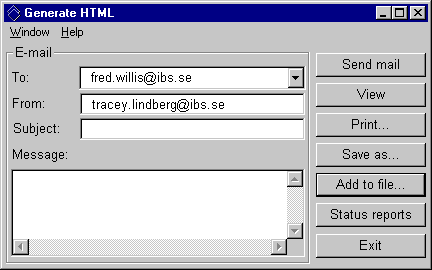
- The system generates the HTML page and you receive the following window:
- To
- Enter the email address of the recipient. If you have previously sent any emails, the recipients’ addresses are saved and can be retrieved by pulling down the drop down list. Note: When this field has been completed, the Send mail button becomes activated. You can send the mail now or complete the remaining fields.
- From
- Defaults with your email address.
- Subject
- If desired, enter a subject for this email.
- Message
- If desired, enter any appropriate message.
- Click Status reports if you want to view information for any previously sent emails.
- View the HTML page by selecting File/View.
- Print the HTML page by selecting File/Print…
- Save the HTML page by selecting File/Save as…
Complete the information in the following fields as desired:
Other functions:
Before sending the HTML page by email you have the option to do any of the following:
When ready click Send mail. If you marked the option for Notify while sending mail when configuring your email settings you will receive a message that the file is being sent to the recipient.