This document outlines the instructions for setting up the item matrix functionality allowing you to create a set of items that share the same characteristics, and ultimately simplify sales order line entry and purchase order line entry for items that are grouped in an item matrix. Rather than registering order lines one by one for items that belong to an item matrix during order line entry, the item matrix panel, which holds the matrix items, can be accessed. The user simply enters the applicable quantities for the items required from one window and clicks OK to register the lines in one go.
Sales pricing can also be set up to price the item matrix items as you see fit, using normal pricing techniques as you would set up for any other item, or special item matrix pricing for specific matrix items.
What this document contains:
- Setting up the basic data
- Create the matrix base item
- Create the set of matrix items from the matrix base item
- Sample item matrix setup
- Setting up the pricing for matrix items
Setting up the basic data
| File/Table | To do |
|---|---|
| Function control file | Activate the ITEMMTRX (Item matrix) function to make all item matrix related panels and fields available in the system. |
| Item matrix templates | Item matrix templates must be created for segments 2 and 3. An item matrix template consists of a header (template code and description) and the details. The details are sequenced in intervals of 10 and consist of a value, description and column heading. The column heading will appear in the Item matrix panels as follows:
When you eventually build (create) the matrix base item, the item code for the matrix base item will be derived from what you manually enter for segment 1 and the applicable Template codes you select from this file for Segments 2 and 3. When you then create the matrix items from the matrix base item, the matrix item codes will be derived as follows: Add the template header Add individual template headers for Segments 2 and 3. Click the Add option and complete the following fields:
Click OK to update and then Back. Add the details Select the Details option for the newly added template header.
Click OK to update. Repeat for all applicable values for Segments 2 and 3. |
| Work with segmentation types | The item matrix functionality uses the first three segments. Matrix segmentation types have to be defined which must conform to the following rules:
Add the applicable segmentation types and complete the following fields:
Click OK to update. |
| Item segment values | IF you chose to validate the segments when creating your segmentation types you must enter the segment values that are to be validated.
Click Add and complete the following fields:
Click OK to update. Repeat for any other segments you chose to validate. |
Create the matrix base item
The matrix base item must be created first. It is a simple procedure, whereby the item code for this item is derived from a manually entered value for Segment 1, together with the applicable template codes from the Item matrix templates file for Segment 2 and Segment 3. (The Segments 2 and 3 hold the template that hold the values of the matrix items that will eventually be created). You will never be able to sell or purchase a matrix base item.
The matrix base item is used to:
- create the matrix items
- access the Item matrix panel during item creation, sales order line entry, purchase order line entry and when checking the warehouse availability
- define a sales price when you want limit dependent matrix pricing to be applied to all items in the matrix (i.e. the accumulated quantity for all item combinations within the matrix is used to retrieve the sales price for the sales order lines that the user will create).
- The View control for Item segment entry must be set to YES. On the initial Work with items, Active panel, click the View Contr function key. Set the View control for Item segment entry to YES. Click OK.
- On the initial Work with items, Active panel, click the Add option.
- You access Item file maintenance, Build item code from segments. Complete the following:
- Segmentation type
- Enter the applicable segmentation type from Work with segmentation types. The field names for Segment 1, Segment 2 and Segment 3 fields will be retrieved from Work with segmentation types.
- Segment 1
- Enter the desired value. This entry will be the first part of the matrix base item code.
- Segment 2
- Enter the applicable template code from Work with item matrix templates. This code will be the second part of the matrix base item code.
- Segment 3
- Enter the applicable template code from Work with item matrix templates. This code will be the third part of the matrix base item code.
- Common delimiter
- Depending on the delimiters defined on the segmentation type, the behaviour of this field differs as follows:
- If only one valid delimiter was set up on the segmentation type (and the Blank as delimiter field was set to NO), that will be defaulted to this field and used to separate the item into segments
- If more than one valid delimiter was set up on the segmentation type, nothing will be defaulted to this field. It will be empty. In this case you have two choices:
- If the Blank as delimiter field for the segmentation type was set to NO, you have to enter the common delimiter that is to be valid for all division of segments in this field, or enter the applicable one individually between the segments (which is done in the right hand box beside the segment).
- If the Blank as delimiter field for the segmentation type was set to YES, you can leave this field empty, in which case the item will be created with blanks between the segments.
- If the Blank as delimiter field was set to YES for the segmentation type, and no delimiters were registered, nothing will be defaulted to this field. It will be empty. You can leave this field empty, in which case the item will be created with blanks between the segments.
Click OK to update. Click OK again to confirm this item code.
- You access the Item file maintenance, Basic data panel. The item code for the matrix base item is automatically built and the following fields are automatically filled in:
- Matrix base
- This field is automatically set to YES denoting that this item is the matrix base item.
- Segmentation type
- Displays the segmentation type for this matrix base item.
- Creation date
- Displays the date that this matrix base item was created.
Complete the other mandatory fields on this panel and all other relevant panels. (Tip: It is possible to set up item defaults for the item template that is selected for the item creation. See Set up a new template and default for an item.) Note: Even though you cannot sell or purchase a matrix base item, the matrix items that you will create from this matrix base item will inherit all completed field entries from the matrix base item including any defined sales prices in sales price lists and purchase prices. It is, therefore, strongly recommended that all required field information on the following related panels is entered for the matrix base item to expedite the completion of the creation of the matrix items. If you do not do this for the matrix base item, you must do so for every matrix item that is created from the matrix base item.
(Sales prices and discounts defined on customer contracts have to be defined manually for each specific matrix item. The same applies for purchase prices defined in Supplier agreements. If you use sales pricing methods to price your items, it is possible to define a price (or a discount) for the entire matrix model. See Setting up the pricing for matrix items below for more information.)
- Units
- Manufacturing information if Manufacturing is installed and activated.
- Inventory information
- Warehouses – Activate the warehouse(s) from which the matrix items will be sold (sales orders) and/or to which the matrix items will be received (purchase orders).
- Supplier information – if utilizing the matrix items in purchase order entry. In addition, if you want the end-user to be able to check MDC availability on order matrix panels, the matrix base item must be set up for MDC (even though it will never appear on any MDC orders). This means that the Multi Distribution Centre (MDC) application must be activated and the matrix base item’s main supplier is an MDC supplier.
The following panels could also be completed, depending on how you plan on pricing the matrix items. See Setting up the pricing for matrix items below for the alternatives.
If you know your prices, and you use sales price lists to price your items, it is recommended that you set them up and attach the sales price list to your matrix base item since the pricing will be allocated (i.e. copied) to each matrix item that is created. If you choose not to do this for the matrix base item, the possibility exists to automatically allocate the sales prices from a sales price list, as well as purchase prices, after the items are created via an Allocate matrix price option and function key. See Allocate matrix pricing for items in a sales price list and Allocate matrix pricing for supplier purchase prices for more information.
- Purchase prices – if utilizing the matrix items in purchase order entry.
- Sales prices – if utilizing the matrix items in sales order entry.
Create the set of matrix items from the matrix base item
When the matrix base item has been created, you can create the set of matrix items that hold the same characteristics.
- From the Work with items, Active panel, highlight the Matrix base item and click the Matrix option.
- You access the Work with items, Create matrix items panel listing all values for Segments 2 and Segments 3 from the Item matrix templates file. All combinations of matrix values, which will become the individual matrix items, are selected by default. You can:
- Leave all selected, or
- Click the Clear function key to delete all selections and then select those applicable.
When you click OK you will first access a confirmation panel where all items (with their item descriptions) that are about to be created will be listed. Clicking OK on the confirmation panel will create the items.
- The matrix items from the selected combinations are created and you return to the Work with items, Active panel with the newly created items displayed in the list. The Matrix item column is set to YES for items that were created from a matrix base item.
Item description and foreign item descriptions will be built in a special way as follows:
Item description will be created as: Matrix base item description + column heading for segment 2 matrix template value + column heading for segment 3 matrix template value.
Foreign descriptions will be created in the similar manner, but using translated base item descriptions + translated column headings.
Note: The matrix items inherit all completed field entries from the matrix base item including any sales prices held in a sales price list and purchase prices.
These matrix items can now be entered in sales order line entry and purchase order line entry.
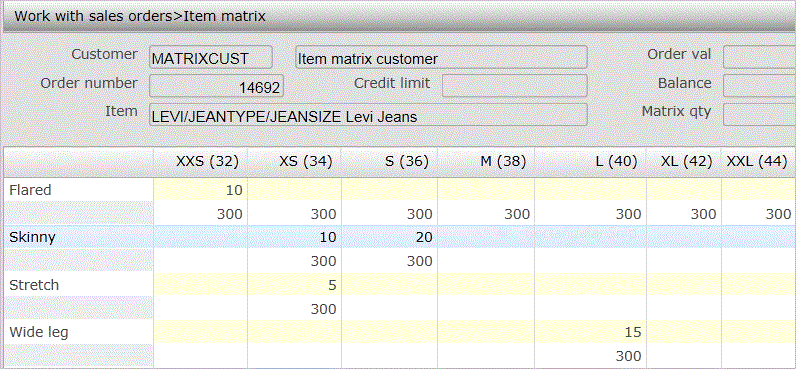
Sample item matrix setup
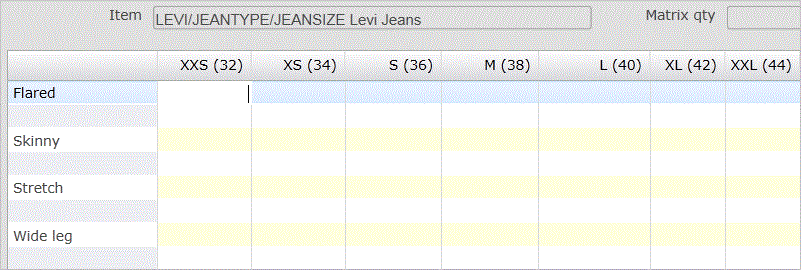
To build an item matrix like the following:
You would set up the basic data as follows:
| File/Table | To do |
|---|---|
| Function control file | Make sure the ITEMMTRX (Item matrix) function is activated. |
| Work with segmentation types |
|
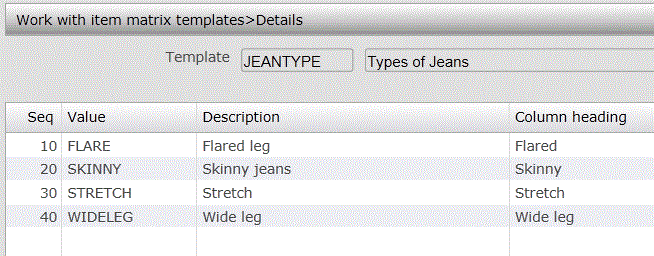
| Item matrix templates | Item matrix template header for segment 2:
Details are as follows for segment 2:
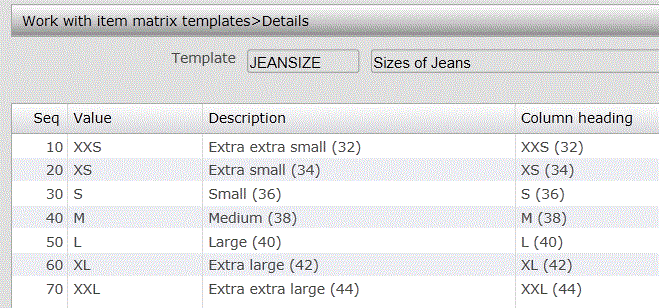
Item matrix template for segment 3:
Details are as follows for segment 3:
|
| Create the matrix base item
(Work with items) |
Make sure the View control for Item segment entry is set to YES. On the initial Work with items, Active panel, click the Add option. When you first access this panel, it looks as follows:
Enter the Segmentation type (for this example, JEANS), to retrieve the “field labels” for Segment 1-3.
Click OK twice to confirm creation of the matrix base item. Note: Even though you cannot sell or purchase a matrix base item, the matrix items that you will create from this matrix base item will inherit all completed field entries from the matrix base item including any defined prices in sales price lists and purchase prices. (Sales prices and discounts defined on item contracts or using sales pricing methods have to be defined manually. The same applies for purchase prices defined in Supplier agreements.) It is, therefore, strongly recommended that all required field information on relevant panels is entered for the matrix base item to expedite the completion of the creation of the matrix items. If you do not do this for the matrix base item, you must do so for every matrix item that is created from the matrix base item. See the Create the matrix base item section above for the list. |
Create the matrix items
(Work with items) |
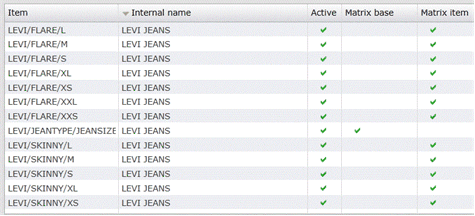
From the Work with items, Active panel, highlight the matrix base item and click the Matrix option. Click OK twice to confirm creation. The following list of matrix related items will be displayed:
|
| Sales order line entry
Purchase order line entry |
To access the Item matrix panel from Work with sales orders, Order lines or Work with purchase order, Order lines panel, the user has two choices:
If you just want to select/add a line for a matrix item without accessing the Item matrix panel, enter the first segment of the matrix base item and click the window prompt icon to access the Select item panel and from there select the applicable item. An example of the Item matrix panel accessed from sales order line entry is depicted below, where the user can enter the applicable quantities for the matrix items required. The available quantity is displayed for each matrix item combination on the second line.
|


Setting up the pricing for matrix items
The sales pricing for matrix-related items is flexible. The following options are available, allowing the price to automatically be retrieved during sales order entry:
- Normal pricing techniques using sales price lists, sales pricing methods and/or customer contracts. See Setting up the sales pricing functionality for more information.
- If you use sales price lists to price your items, you can set up the prices and attach the sales price list to your matrix base item. The pricing will then be allocated (i.e. copied) to each matrix item that is created. Alternatively, you can allocate the price from a sales price list from a specific matrix item.
- If you use sales pricing methods to price your items, you use the DIS control keys that are available for pricing. If, e.g., Segment 1 is one of your keys in the sales pricing method, it is possible to define a price (or a discount) for the entire matrix model. Hence, the price (or discount) for any of the related matrix items registered for a sales order can be retrieved from the sales pricing method.
- If you use customer contracts to price your items, the prices must be set up on each specific matrix item.
- Limit dependent pricing, (i.e. based on quantity limits, amount limits or matrix limits) using (and connected to) sales price lists, sales pricing methods and/or customer contracts. See About setting up limit dependent pricing. Matrix limit pricing is advantageous when you want to price the matrix-related items that belong to one matrix based on an accumulated matrix quantity. When the pricing program is run the system will accumulate the quantity for all sales order lines that have the same “Segment 1 value” and compare that accumulated quantity to the matrix limit.
The limit dependent pricing can be set up for matrix items using the limit type for Q (Quantity limits) or A (Amount limits) or for all items in the matrix that have the same “Segment 1 value” using the limit type for M (Matrix limits)
- If you set up Quantity limits to be used for a matrix item, the pricing retrieval will work as standard (i.e. the line quantity for the specific SO line for this matrix item will be compared to the quantity limits).
- If you set up Amount limits to be used for a matrix item, the pricing retrieval will work as standard (i.e. the line amount for the specific SO line for this matrix item will be compared to the amount limits).
- If you set up Matrix limits (M) for your matrix item, the pricing retrieval will work as follows: the accumulated quantity for all sales order lines that have the same “Segment 1 value” will be compared to the matrix limit.
As with any other items, the limit dependent pricing for item matrix related items can be performed in two main ways:
- Either, by using a predefined set of limits, along with their discounts, held against a user-defined limit code in the Limit code table. These predefined limits can be connected, via the limit code, in a Sales price list, Customer contract and/or Sales pricing method.
- Or, by defining the limits, prices, or discounts, uniquely against an item in a Sales price list, Customer contract, or Sales pricing method
Depending on how you choose to set up your pricing, it can be possible that the pricing program finds a price for a matrix item that is connected to limit type Q and another price that is connected to limit type M. In such a scenario, the normal pricing rules will be applied, and the best (or first) price is selected.
See the Pricing and Discounts options in the applicable document listed below for instructions:
- Add and price the items in the sales price list
- Allocate matrix pricing for items in a sales price list
- Set up a normal method and define the pricing/discounting
- Set up a chain discount method and define the discounting
- Set up a promotion method and define the pricing/discounting
- Add and price the items in a customer contract